
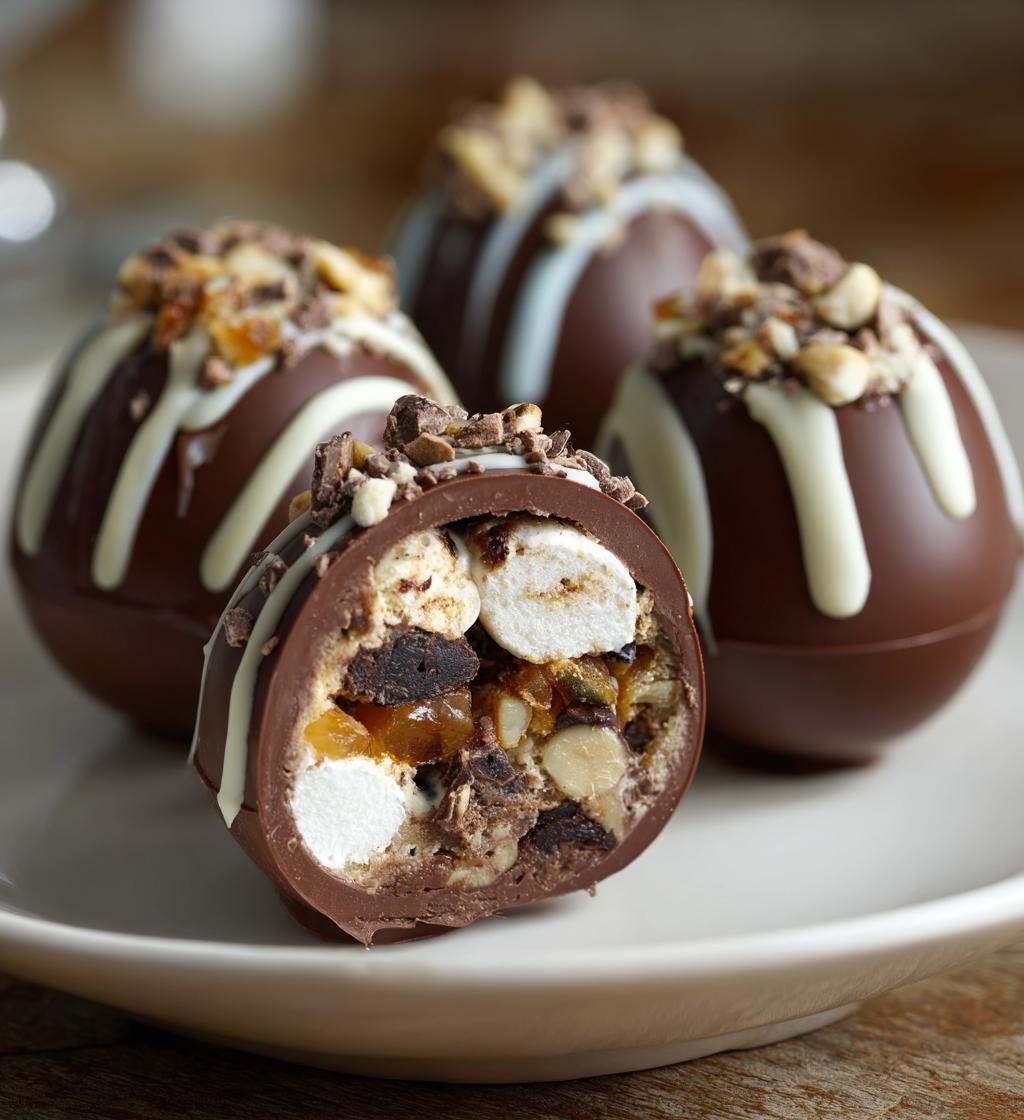
There’s something truly magical about making chocolate Easter eggs at home. The joy of transforming simple ingredients into delightful treats that bring smiles is an experience like no other! Trust me, whether you’re creating them for your family or as thoughtful gifts, the process is just as fun as the end result. One of the best parts of this recipe is the ability to customize your fillings. From gooey marshmallows to crunchy nuts or sweet dried fruits, the possibilities are endless! With just a bit of creativity, you can craft unique Easter eggs that reflect your taste. Plus, making these chocolate Easter eggs recipes together can become a cherished tradition. So, roll up your sleeves and get ready to indulge in a deliciously sweet and satisfying adventure!
Ingredients List
Before we dive into the fun part of making chocolate Easter eggs, let’s gather all the necessary ingredients! Here’s what you’ll need:
- 200g dark chocolate: Good quality is key! This will be the outer shell that gives your eggs a rich, deep flavor.
- 200g milk chocolate: Adds sweetness and creaminess to balance the darkness of the dark chocolate.
- 100g white chocolate: For that lovely drizzle on top, it also adds a sweet finishing touch!
- 1 cup mini marshmallows: These little puffs of joy will add a delightful gooeyness inside your eggs.
- 1/2 cup chopped nuts: I love using walnuts or pecans for a nice crunch, but feel free to use your favorite nuts!
- 1/2 cup dried fruit: Raisins, cranberries, or apricots work wonderfully to give a fruity burst of flavor.
Gather these ingredients, and you’ll be all set to create something truly special!
How to Prepare Easter Eggs Recipes Chocolate
Alright, let’s get down to the fun part – making those delightful chocolate Easter eggs! This process is straightforward, and I’m here to guide you through it step by step. You’ll want to start by melting your dark chocolate. You can use a heatproof bowl set over a pot of simmering water, creating a double boiler. This method prevents the chocolate from burning, which is key to achieving that silky smooth texture. Once melted, coat the inside of your egg molds with the dark chocolate, making sure to cover every nook and cranny. Let that set in the fridge for about 10-15 minutes until firm.
Now, onto the milk chocolate! Melt it just like you did with the dark chocolate. Once it’s ready, fill the molds halfway with the milk chocolate, making sure to leave enough space for your fillings. Here’s where your creativity can shine! Toss in those mini marshmallows, chopped nuts, and dried fruit for a delightful surprise in every bite. After that, cover the fillings with more melted milk chocolate until the molds are full. Pop them back in the fridge to set for another 15 minutes. Once everything is solidified, gently remove the eggs from the molds. Finally, drizzle some melted white chocolate on top for that extra touch of sweetness and a beautiful finish!
How to Prepare Easter Eggs Recipes Chocolate
Alright, let’s get down to the fun part – making those delightful chocolate Easter eggs! This process is straightforward, and I’m here to guide you through it step by step. You’ll want to start by melting your dark chocolate. You can use a heatproof bowl set over a pot of simmering water, creating a double boiler. This method prevents the chocolate from burning, which is key to achieving that silky smooth texture. Once melted, coat the inside of your egg molds with the dark chocolate, making sure to cover every nook and cranny. Let that set in the fridge for about 10-15 minutes until firm.
Now, onto the milk chocolate! Melt it just like you did with the dark chocolate. Once it’s ready, fill the molds halfway with the milk chocolate, making sure to leave enough space for your fillings. Here’s where your creativity can shine! Toss in those mini marshmallows, chopped nuts, and dried fruit for a delightful surprise in every bite. After that, cover the fillings with more melted milk chocolate until the molds are full. Pop them back in the fridge to set for another 15 minutes. Once everything is solidified, gently remove the eggs from the molds. Finally, drizzle some melted white chocolate on top for that extra touch of sweetness and a beautiful finish!
Step-by-Step Instructions
1. **Melt the dark chocolate:** Start by chopping your dark chocolate into small pieces for even melting. Place it in a heatproof bowl over simmering water. Stir occasionally until it’s completely smooth and melted. This should take about 5-7 minutes.
2. **Coat the molds:** Using a spoon or a silicone brush, carefully coat the inside of your egg molds with the melted dark chocolate. Make sure to cover every surface to form a sturdy shell. Don’t rush this part; it’s worth taking your time to get it right!
3. **Chill to set:** Once the molds are coated, pop them in the fridge for about 10-15 minutes to allow the chocolate to harden. You want it to be firm but not overly hard.
4. **Fill with milk chocolate:** Melt the milk chocolate in the same way as before. Once melted, fill the molds halfway with this creamy goodness. Be sure to leave enough space for your fun fillings.
5. **Add the fillings:** Now comes the fun part! Sprinkle in your mini marshmallows, chopped nuts, and dried fruit. Get creative! You can even mix and match to create different flavor profiles.
6. **Complete the molds:** Cover the fillings with more melted milk chocolate until the molds are filled to the top. Smooth it out as needed, then return them to the fridge for another 15 minutes to harden fully.
7. **Remove and decorate:** Carefully pop the eggs out of the molds. If they stick a little, gently twist the molds or run a knife around the edges. Finally, drizzle melted white chocolate on top for a beautiful finishing touch. Enjoy your homemade chocolate Easter eggs!
Why You’ll Love This Recipe
This chocolate Easter eggs recipe is not just fun to make, but it also comes with some fantastic perks! Here’s why you’ll adore it:
- Quick Preparation: With just 45 minutes from start to finish, you can whip up a batch of these delightful treats in no time!
- Endless Customization: Choose your favorite fillings – whether it’s gooey marshmallows, crunchy nuts, or sweet dried fruits, you can get creative!
- Delicious Flavors: The combination of dark, milk, and white chocolate creates a symphony of flavors that’s simply irresistible.
- Perfect for Sharing: These eggs make great gifts or party favors, spreading joy wherever they go!
Tips for Success
To ensure your chocolate Easter eggs turn out perfectly every time, here are some pro tips that I can’t recommend enough:
- Chocolate Quality Matters: Use high-quality chocolate for melting. It makes a noticeable difference in taste and texture!
- Keep It Dry: Make sure your bowls and utensils are completely dry before melting chocolate. Even a drop of water can cause the chocolate to seize.
- Layering Technique: Don’t rush the layering process. Allow each layer to set properly in the fridge before adding the next. This ensures a sturdy shell and avoids leaks.
- Mold Options: If you don’t have traditional egg molds, silicone muffin cups work great too. They’re flexible and make for easier removal.
- Experiment with Fillings: Feel free to experiment! Swap in your favorite candies, or even add some flavored extracts to the chocolate for a fun twist.
Follow these tips, and you’ll be well on your way to creating beautiful, delicious chocolate Easter eggs that everyone will love!
Variations
One of the best parts about this chocolate Easter eggs recipe is how easily you can mix things up! If you’re feeling adventurous, try using different types of chocolate. White chocolate can be the star of the show instead of milk chocolate, or go for a bittersweet dark chocolate for a more intense flavor. When it comes to fillings, the sky’s the limit! Consider adding peanut butter or Nutella for a creamy surprise, or even crushed cookies for a delightful crunch. Dried coconut or candied ginger can also bring a unique twist. Get creative and make these eggs your own!
Storage & Reheating Instructions
To keep your chocolate Easter eggs fresh and delicious, store them in a cool, dry place. I recommend using an airtight container to prevent them from absorbing any odors or moisture. If it’s warm in your kitchen, you can pop them in the fridge for extra protection, but make sure they’re well-wrapped to avoid condensation.
If you need to reheat them for any reason, be cautious! Use the microwave in short bursts of 10-15 seconds on low power to gently warm the chocolate without melting it completely. This way, you can enjoy your delightful treats without compromising their texture!
Nutritional Information Section
Now, let’s take a look at the estimated nutritional information for these delightful chocolate Easter eggs. Keep in mind that these values are approximate and can vary based on specific ingredients used:
- Calories: 250 per egg
- Fat: 15g (Saturated Fat: 8g, Unsaturated Fat: 5g, Trans Fat: 0g)
- Protein: 3g
- Carbohydrates: 30g (Sugar: 20g, Fiber: 2g)
- Sodium: 50mg
- Cholesterol: 10mg
These treats are sweet and satisfying, perfect for an occasional indulgence during the holiday season!
FAQ Section
Got questions about making these delightful chocolate Easter eggs? Don’t worry; I’ve got you covered! Here are some of the most common queries I get:
- Can I use different types of chocolate? Absolutely! Feel free to mix and match. Dark chocolate works wonderfully, but you can also use white or milk chocolate as your base. Each type brings its unique flavor!
- How do I prevent the chocolate from seizing? The key is to keep everything dry! Make sure all your utensils and bowls are completely moisture-free before melting the chocolate. Even a tiny drop of water can cause it to seize up.
- What can I substitute for the fillings? You can get creative here! Instead of mini marshmallows, try using caramel bits or even cookie crumbs. For fruits, consider dried cherries or figs for a different flavor profile!
- How long do these chocolate Easter eggs last? If stored properly in an airtight container, they can last up to a week or so. Just keep them in a cool, dry place to maintain their freshness!
- Can kids help with this recipe? Yes! This is a fun project for kids. Just supervise them while melting the chocolate and allow them to get creative with the fillings!
There you have it! I hope these answers help you feel confident and excited to create your own chocolate Easter eggs recipes at home!
Print
Easter Eggs Recipes Chocolate: 7 Magical Treats to Make
Delicious chocolate Easter eggs recipe
- Total Time: 45 minutes
- Yield: 10 eggs 1x
Ingredients
- 200g dark chocolate
- 200g milk chocolate
- 100g white chocolate
- 1 cup mini marshmallows
- 1/2 cup chopped nuts
- 1/2 cup dried fruit
Instructions
- Melt dark chocolate in a bowl over simmering water.
- Coat the inside of egg molds with melted dark chocolate and let it set.
- Melt milk chocolate and fill the molds halfway.
- Add mini marshmallows, nuts, and dried fruit.
- Cover with more melted milk chocolate and let it set.
- Once set, remove the eggs from the molds.
- Drizzle melted white chocolate on top for decoration.
Notes
- Use silicone molds for easy removal.
- Store eggs in a cool place.
- Feel free to customize fillings.
- Prep Time: 30 minutes
- Cook Time: 15 minutes
- Category: Dessert
- Method: Molding
- Cuisine: American
- Diet: Vegetarian
Nutrition
- Serving Size: 1 egg
- Calories: 250
- Sugar: 20g
- Sodium: 50mg
- Fat: 15g
- Saturated Fat: 8g
- Unsaturated Fat: 5g
- Trans Fat: 0g
- Carbohydrates: 30g
- Fiber: 2g
- Protein: 3g
- Cholesterol: 10mg
Keywords: Easter eggs recipes chocolate