
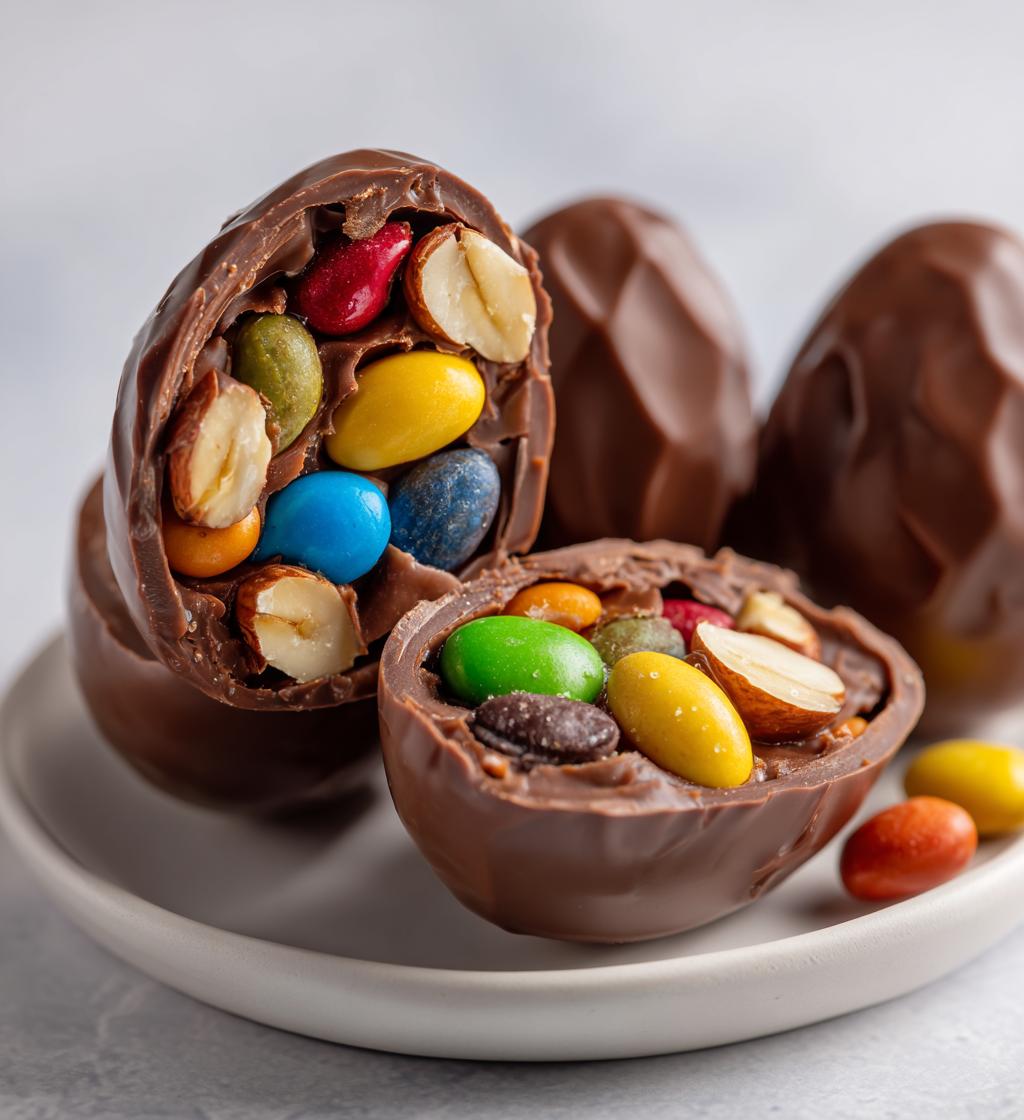
Oh, the joy of creating your own filled chocolate Easter eggs! There’s something utterly magical about molding chocolate into beautiful egg shapes and then letting your imagination run wild with the fillings. Trust me, there’s nothing like the feeling of biting into a rich chocolate shell to discover a treasure trove of your favorite treats tucked inside.
You get to choose exactly what goes in—maybe it’s crunchy nuts, chewy candies, or a silky cream. The best part? You can make these delightful treats right in your kitchen, turning a simple afternoon into a fun-filled bonding experience with your family or friends. Picture everyone gathered around the table, laughing and experimenting with flavors, as you all embark on a sweet adventure together. It’s the perfect way to celebrate the season and create lasting memories!
Ingredients List
- 200g chopped dark chocolate – This is your star player, bringing that rich, intense flavor that pairs perfectly with all your fillings.
- 100g chopped milk chocolate – For a touch of sweetness and creaminess, this chocolate adds a delightful contrast to the dark chocolate.
- 50g chopped white chocolate – This is optional, but trust me, it brings a lovely sweetness and a beautiful finish to your eggs.
- 1 cup of assorted fillings – Get creative here! You can use crunchy nuts, chewy candies, or even a luscious cream filling. The sky’s the limit!
How to Prepare DIY Filled Chocolate Easter Eggs
Now, let’s dive into the fun part—making these gorgeous filled chocolate Easter eggs! This step-by-step guide will have you creating your very own chocolate masterpieces in no time. Just follow along, and let’s get started!
Step 1: Melt the Dark Chocolate
First things first, grab that 200g of dark chocolate and chop it into small, even pieces. This will help it melt smoothly without any pesky lumps. Next, set up a double boiler by placing a heatproof bowl over a pot of simmering water. Make sure the bowl doesn’t touch the water; we just want the steam to do its magic! Stir the chocolate gently as it melts, and watch closely—overheating can make it seize up, which is a total bummer. You want it silky and smooth, perfect for coating!
Step 2: Mold the Chocolate Eggs
Once your dark chocolate is melted and dreamy, it’s time to mold those eggs! Grab your egg-shaped molds (silicone works beautifully) and start coating the insides with the melted chocolate. Use a spoon to spread it evenly, making sure there are no thin spots. I like to give it a little twist to get an even coat. You want those eggs to be sturdy enough to hold your fillings later. If you have extra melted chocolate, don’t worry; just go back and add another layer for good measure!
Step 3: Chill to Set
After you’ve coated the molds, pop them in the fridge for about 30 minutes. This chilling time is crucial! It allows the chocolate to harden properly, making it easier to fill without breaking. You’ll know they’re ready when they feel firm to the touch. So go ahead, take a little break and maybe sneak a taste of leftover chocolate (no judgment here!).
Step 4: Fill the Eggs
Now comes the fun part—filling those eggs! Carefully take the molds out of the fridge and gently peel back the edges. You should have a lovely chocolate shell ready to be filled. Think about your favorite flavors and get creative! Use that cup of assorted fillings—whether it’s crunchy nuts, chewy candies, or even a creamy filling. The combinations are endless! Just don’t overstuff them; you want room for a nice seal later.
Step 5: Seal with Milk Chocolate
Time to seal the eggs! Melt your 100g of milk chocolate just like you did with the dark chocolate. Once it’s melted, spoon a bit of the milk chocolate over each filled egg and spread it evenly to cover the opening. This is where the magic happens—make sure to seal it well so no fillings escape! A nice, thick layer will ensure they stay together beautifully.
Step 6: Final Chill
Pop those beautifully sealed eggs back into the fridge and let them chill again until they’re firm—about another 30 minutes. This step is super important because it ensures your eggs are solid and ready for the grand un-molding. You want them to feel nice and sturdy before you go ahead and remove them from the molds.
Step 7: Unmold and Enjoy
Finally, the moment of truth! Carefully remove the eggs from the molds. If you used silicone molds, they should pop out easily, but if you’re using a harder mold, just give them a gentle squeeze. Once they’re out, why not present them on a lovely platter? You can even drizzle some melted chocolate on top for a fancy touch or sprinkle some colorful toppings to make them pop. Get ready to enjoy these delightful treats—trust me, they’ll be a hit!
Nutritional Information
Here’s the estimated nutritional data you can expect for each filled chocolate Easter egg. Remember, this is just an estimate, but it gives you a good idea of what you’re indulging in!
- Calories: 150
- Fat: 9g
- Saturated Fat: 5g
- Unsaturated Fat: 3g
- Trans Fat: 0g
- Sugar: 12g
- Sodium: 10mg
- Carbohydrates: 15g
- Fiber: 1g
- Protein: 2g
- Cholesterol: 5mg
So, as you dive into these delectable treats, you can enjoy them guilt-free, knowing you’ve created something special right at home!
Why You’ll Love This Recipe
Let me tell you, there’s a world of joy packed into these DIY filled chocolate Easter eggs! First off, the best part is how completely customizable they are. You get to pick your favorite fillings, whether that’s crunchy nuts, fruity candies, or even a smooth cream that just melts in your mouth. Each egg can be a little adventure of flavor, and no two will ever be the same!
But it’s not just about the deliciousness; making these eggs is a fantastic activity for families. Imagine gathering everyone around the kitchen, laughing and chatting while you fill the molds. Kids especially love getting their hands sticky and experimenting with different combinations. It’s a sweet way to create memories together, and who doesn’t love that?
Plus, these filled chocolate eggs are the perfect festive treat for Easter! They add a personal touch to your celebrations and make great gifts for friends and family. You’ll be the star of the Easter brunch when you bring out a platter of these beauties, and trust me, they’ll disappear faster than you can say “chocolate!”
And let’s not forget how easy they are to make! With just a few simple steps, you can whip up a batch of these delightful treats without breaking a sweat. It’s a fun project that even novice bakers can tackle with confidence. So, roll up your sleeves, and let’s dive into the delicious world of DIY filled chocolate Easter eggs—you won’t regret it!
Tips for Success
Alright, let’s make sure your DIY filled chocolate Easter eggs turn out absolutely perfect! Here are my top tips to help you achieve the best results:
Choose Quality Chocolate
First off, don’t skimp on the chocolate! Using high-quality chocolate makes a huge difference in flavor and texture. Look for chocolate that has a high cocoa content for rich, deep flavors. Trust me, your taste buds will thank you! Cheap chocolate can melt poorly and may not set up right, leading to disappointing results.
Ensure Even Melting
When melting your chocolate, it’s super important to do it slowly and evenly. Stir it gently as it melts, and don’t rush the process. If you get impatient and crank up the heat, you might end up with a grainy mess. We want that smooth, glossy finish that will make your eggs shine!
Experiment with Fillings
Feel free to get creative with your fillings! Don’t be afraid to mix and match your favorite treats. You can even try adding different flavors to your cream fillings—think vanilla, orange zest, or even a hint of espresso for a delicious twist! Just keep in mind to balance the flavors so that they complement the chocolate rather than overpowering it.
Keep Everything Cool
Temperature plays a key role in chocolate making. Make sure your workspace is cool, and try to work quickly after melting the chocolate. If it starts to harden, just give it a quick reheat over the double boiler. Also, remember to chill your molds in the fridge before pouring in the chocolate. This helps the chocolate set more evenly!
Practice Patience
Lastly, patience is your best friend in this process. Allow enough chilling time between steps to ensure everything sets properly. Rushing could lead to s or uneven shapes, and we want those eggs to look as good as they taste! So take a deep breath, enjoy the process, and savor the sweet rewards.
With these tips in your back pocket, you’re all set to create stunning filled chocolate Easter eggs that’ll impress everyone! Happy chocolate making!
Variations
The fun doesn’t stop with just one recipe for filled chocolate Easter eggs! There are so many creative ways to switch things up and make these treats uniquely yours. Let’s dive into some delicious variations!
Try Different Types of Chocolate
If you’re a chocolate lover like me, experimenting with different types of chocolate can lead to some delightful surprises! Instead of just dark and milk chocolate, why not try white chocolate for a sweeter twist? Or go bold with a rich milk chocolate base and add a layer of dark chocolate on top for that perfect contrast. You could even mix in flavored chocolates, like orange-infused or mint chocolate, to give your eggs an extra zing!
Add Flavor to Your Fillings
The fillings are where you can really let your creativity shine! Instead of sticking to the classic nuts and candies, think about adding flavors to your cream fillings. A splash of almond extract or a dash of coconut will elevate your eggs to the next level. You can also mix in some crushed cookies or flavored sprinkles for added texture and taste. Just imagine biting into a chocolate egg with a refreshing mint cream filling—yum!
Make Mini Eggs for a Cute Treat
Feeling adventurous? Why not try making mini eggs? Use a smaller mold to create bite-sized versions of your filled chocolate eggs. These little treats are perfect for party favors or simply for those who want a smaller indulgence. Plus, they’re great for kids who love to pop them in their mouths! You can fill them with the same delicious fillings or change it up with different flavors in each mini egg. It’s a fun way to mix and match!
Incorporate Seasonal Flavors
Take advantage of seasonal flavors by adding ingredients that match the holidays. For example, during fall, you could incorporate pumpkin spice into your cream fillings or add some maple syrup to your nut mixes. In summer, fresh fruits like dried strawberries or blueberries could make a delightful filling that pairs perfectly with chocolate. The possibilities are as endless as your imagination!
With these variations, you can make your DIY filled chocolate Easter eggs a true reflection of your taste and creativity. So grab your ingredients and get ready to create a whole new world of chocolatey goodness!
Serving Suggestions
Once you’ve crafted these delightful DIY filled chocolate Easter eggs, the fun doesn’t end there! How you serve them can elevate the whole experience, making your treats even more festive and exciting. Here are some of my favorite serving suggestions to impress your family and friends!
As Part of an Easter Dessert Platter
Picture this: a beautiful dessert platter filled with your filled chocolate Easter eggs, surrounded by an array of other treats. You could include classic goodies like pastel-colored macarons, mini cupcakes with spring-themed decorations, or even a vibrant fruit tart. The contrast of colors and textures will not only make the platter visually stunning but also offer something for everyone’s taste buds!
Accompany with Fresh Fruit
For a refreshing twist, serve your chocolate eggs alongside some fresh fruits. Think strawberries, raspberries, or even slices of juicy oranges. The bright, natural sweetness of the fruit pairs beautifully with the rich chocolate. Plus, it adds a nice balance, making your dessert feel a bit lighter and perfect for springtime!
In Easter Baskets
Want to add a personal touch to your Easter baskets? These filled chocolate eggs make fantastic additions! Nestle them among colorful shredded paper or grass, and watch the eyes of your loved ones light up when they discover the homemade treats inside. You can even get creative by wrapping each egg in a small piece of decorative foil or placing them in cute little egg cups to enhance the presentation!
As Party Favors
If you’re hosting an Easter gathering, why not turn your filled chocolate eggs into charming party favors? Simply wrap each egg in cellophane and tie it with a pretty ribbon. Your guests will love taking home a piece of the celebration, and they’ll appreciate the extra effort you put into creating something special just for them!
Drizzle with Sauces or Sprinkles
For an extra touch of flair, consider drizzling some melted chocolate or caramel sauce over your filled eggs before serving. You could even sprinkle some colorful edible glitter or crushed nuts on top for added texture and visual appeal. It’s these little details that make your treats pop and show off your creativity!
Whichever way you choose to serve your DIY filled chocolate Easter eggs, they’re sure to be a hit! Enjoy the delightful reactions from your family and friends as they savor every last bite of your delicious creations.
Storage & Reheating Instructions
So, you’ve made these scrumptious DIY filled chocolate Easter eggs, and now you might be wondering how to keep them fresh. Don’t worry, I’ve got you covered! Proper storage is key to ensuring your chocolate eggs stay delicious for as long as possible.
First off, you’ll want to store your filled chocolate eggs in a cool, dry place. I recommend using an airtight container to keep them safe from moisture and any unwanted odors. If you have a particularly warm kitchen, it’s best to keep them in the fridge, but be sure to let them come to room temperature before indulging. This way, they’ll regain that nice, melt-in-your-mouth texture!
If you’ve made a batch and find yourself with leftovers (which, let’s be honest, is a rare occurrence), they can last about a week in the refrigerator. Just make sure they’re well-wrapped or in a sealed container to maintain their freshness. I wouldn’t recommend freezing these beauties, as the texture might not hold up well once thawed. Chocolate can be fickle that way!
Now, if you ever find yourself in the mood for a warm chocolate treat, you can gently reheat them. Just be cautious—microwave in short bursts of 10-15 seconds, checking often to avoid melting them completely. Alternatively, you can place them in a warm oven (around 200°F) for a couple of minutes. This method will give you that lovely, gooey chocolate experience without compromising the egg’s structure.
So, keep your filled chocolate Easter eggs stored properly, and they’ll be ready to delight your taste buds whenever the craving strikes! Enjoy every last bite, and don’t forget to share with loved ones—if you can resist the temptation!
Print
DIY Filled Chocolate Easter Eggs: 7 Whimsical Flavors Await
Make your own filled chocolate Easter eggs at home.
- Total Time: 1 hour
- Yield: 12 eggs 1x
Ingredients
- 200g dark chocolate
- 100g milk chocolate
- 50g white chocolate
- 1 cup of assorted fillings (e.g., nuts, candies, cream)
Instructions
- Chop the dark chocolate and melt it in a bowl over hot water.
- Use a mold to shape the eggs and coat the inside with melted chocolate.
- Let the chocolate set in the fridge for 30 minutes.
- Fill the eggs with your choice of fillings.
- Melt the milk chocolate and seal the eggs.
- Chill again until firm.
- Remove from the mold and enjoy.
Notes
- Use quality chocolate for best results.
- Experiment with different fillings.
- Store in a cool place.
- Prep Time: 20 minutes
- Cook Time: 10 minutes
- Category: Dessert
- Method: Molding and Filling
- Cuisine: American
- Diet: Vegetarian
Nutrition
- Serving Size: 1 egg
- Calories: 150
- Sugar: 12g
- Sodium: 10mg
- Fat: 9g
- Saturated Fat: 5g
- Unsaturated Fat: 3g
- Trans Fat: 0g
- Carbohydrates: 15g
- Fiber: 1g
- Protein: 2g
- Cholesterol: 5mg
Keywords: diy filled chocolate easter eggs