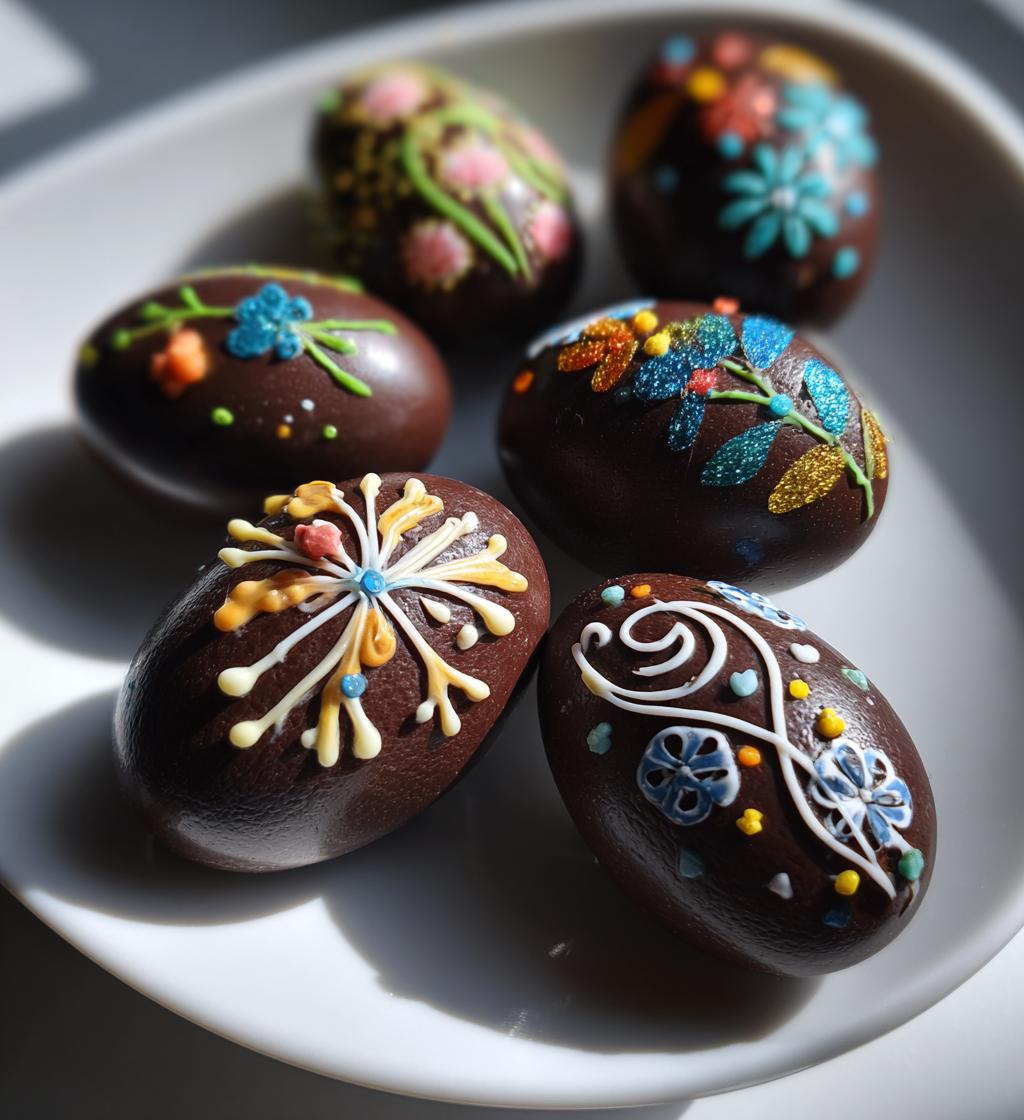
Have you ever wanted to mix creativity with deliciousness? That’s exactly what making chocolate art sculpture Easter eggs is all about! There’s something truly magical about transforming simple ingredients into beautiful, edible masterpieces. I can’t tell you how many times I’ve gathered my family around the kitchen to dive into this delightful project. It’s not just about the end result, but the laughter and joy that comes with it! Imagine the satisfaction of crafting your own chocolate eggs, each one a unique work of art. You can let your imagination run wild with colors and decorations, making them perfect for Easter celebrations or any sweet occasion. Trust me, when you see those glossy, colorful eggs emerge from the molds, you’ll feel like a true artist! So, let’s roll up our sleeves and get started on creating these delightful chocolate art sculptures that are sure to impress everyone!
Ingredients List
Alright, let’s gather our ingredients! Here’s what you’ll need to create your stunning chocolate art sculpture Easter eggs:
- 2 cups dark chocolate chips: Choose high-quality ones for a richer flavor.
- 1 cup white chocolate chips: These will be for the decorative touch!
- 2 tablespoons vegetable oil: This helps to make the chocolate smooth and shiny.
- Food coloring (optional): Get creative with colors to make your designs pop.
- Edible glitter (optional): A little sparkle goes a long way in making your eggs festive!
Having everything ready will make the process smooth and enjoyable. Let’s get ready to melt some chocolate!
How to Prepare Chocolate Art Sculpture Easter Eggs
Now that we’ve got our ingredients ready, it’s time to dive into the fun part! Here’s a step-by-step guide to creating your own chocolate art sculptures in the shape of Easter eggs. Get ready to unleash your inner chocolatier!
Step 1: Melting the Chocolate
First things first, let’s melt those dark chocolate chips! Grab a microwave-safe bowl and pour in your 2 cups of chocolate chips. To melt them, microwave in short bursts of about 30 seconds. After each interval, give the chocolate a good stir until it’s completely smooth and glossy. Be careful though! Chocolate can seize up if overheated, so keep an eye on it. If you notice any small lumps, don’t panic! Just stir gently, and they should melt into the mix. Once it’s nice and smooth, add in 2 tablespoons of vegetable oil to give it that shiny finish. Stir until fully combined, and we’re ready to move on!
Step 2: Preparing the Molds
Now, let’s pour that luscious melted chocolate into our silicone egg molds. Carefully spoon the chocolate into each mold, making sure to fill them up nicely. You can use a small spatula or the back of a spoon to spread it evenly. Once filled, give the molds a gentle tap on the counter to remove any air bubbles – this will ensure a smooth finish! Now, here’s the crucial part: pop those molds into the refrigerator for about 30 minutes. This allows the chocolate to set properly, creating a sturdy structure for your beautiful eggs.
Step 3: Decorating the Eggs
While we wait, let’s prepare to decorate! Melt your white chocolate chips in the same way we did with the dark chocolate, again in short bursts in the microwave. If you want to add some color, now’s the time to mix in a few drops of food coloring until you achieve your desired shade. Once it’s melted and ready, take your dark chocolate eggs out of the molds. You’ll want to be gentle here, as we don’t want any breakage! Use a piping bag or a simple zip-top bag with the corner snipped off to drizzle the colored white chocolate over your eggs. Have fun with it—swirls, stripes, or even little dots! And don’t forget the edible glitter for that extra sparkle! Sprinkle it on while the chocolate is still warm so it sticks nicely. Allow everything to cool and set, and voilà! You’ve created your own chocolate art sculpture Easter eggs!
Why You’ll Love This Recipe
Making chocolate art sculpture Easter eggs is not only a delightful activity but also a wonderful way to express your creativity! Here’s why you’ll adore this recipe:
- Fun for All Ages: Gather the family and create lasting memories while crafting these beautiful eggs together!
- Endless Creativity: With colors, patterns, and decorations, you can make each egg a unique work of art.
- Perfect for Celebrations: These stunning chocolate sculptures are ideal for Easter, birthdays, or any festive occasion.
- Deliciously Edible: Not only do they look amazing, but they taste fantastic too!
- Great for Gifting: Surprise friends and loved ones with a personal touch that’s sure to impress!
Tips for Success
To ensure your chocolate art sculpture Easter eggs turn out beautifully, here are some tried-and-true tips! First, always opt for high-quality chocolate; it makes a world of difference in taste and texture. When melting, be patient and use shorter bursts in the microwave to avoid overheating. If you want to get creative, try mixing different colors of food coloring for a marbled effect! Also, don’t be shy with the edible glitter—it’s what makes your eggs sparkle and pop! Lastly, make sure to store your finished creations in a cool place to keep them fresh and looking fabulous!
Nutritional Information Section
Now, let’s talk about the nutritional information for these delightful chocolate art sculpture Easter eggs! Each egg packs a tasty punch with approximately:
- Calories: 200
- Fat: 12g
- Saturated Fat: 7g
- Trans Fat: 0g
- Cholesterol: 0mg
- Carbohydrates: 22g
- Fiber: 2g
- Sugar: 15g
- Protein: 3g
- Sodium: 5mg
Keep in mind that these values are estimates and can vary based on the specific ingredients you use. Enjoy these treats as part of a balanced diet, and indulge in the joy of creation!
FAQ Section
If you’re diving into the world of chocolate art sculpture Easter eggs for the first time, you might have a few questions. Don’t worry, I’ve got you covered!
Can I use different types of chocolate?
Absolutely! While dark and white chocolate are my favorites, feel free to experiment with milk chocolate or even flavored chocolates for a unique twist.
How should I store my chocolate sculptures?
To keep your creations fresh and shiny, store them in a cool, dry place, ideally in an airtight container. Avoid the fridge to prevent condensation!
What if my chocolate seizes while melting?
No worries! If this happens, try adding a teaspoon of vegetable oil and stirring gently. It often helps bring it back to a smooth consistency.
Can I make these eggs in advance?
Yes! These chocolate sculptures can be made a few days ahead of time. Just remember to store them properly to maintain their deliciousness!
What else can I decorate my eggs with?
You can use nuts, sprinkles, or even dried fruits for a fun and tasty twist on your designs. Get creative!
Storage & Reheating Instructions
To keep your gorgeous chocolate art sculpture Easter eggs fresh and delicious, store them in an airtight container in a cool, dry place. This helps maintain their beautiful sheen and prevents any melting or condensation. Avoid placing them in the refrigerator, as the humidity can cause them to lose their luster and texture. If you need to store them for more than a few days, try to keep them away from direct sunlight or heat sources. These treats are best enjoyed at room temperature, so just bring them out when you’re ready to share or indulge!
Serving Suggestions
When it comes to showcasing your stunning chocolate art sculpture Easter eggs, presentation is key! You can elevate the experience by serving them on a beautiful platter or cake stand, surrounded by colorful spring flowers or festive decorations. Pair these delightful creations with a rich cup of hot cocoa or a refreshing iced coffee for a wonderful treat. If you’re hosting an Easter brunch, consider placing them alongside other desserts like mini cupcakes or fruit tarts for a charming dessert table. You could even use them as unique place settings or party favors, bringing a personal touch to your celebration!
Print
Chocolate Art Sculpture Easter Eggs: 5 Magical Creations
A creative guide to making chocolate art sculptures in the shape of Easter eggs.
- Total Time: 45 minutes
- Yield: 6 chocolate eggs 1x
Ingredients
- 2 cups dark chocolate chips
- 1 cup white chocolate chips
- 2 tablespoons vegetable oil
- Food coloring (optional)
- Edible glitter (optional)
Instructions
- Melt the dark chocolate chips in a microwave-safe bowl.
- Add vegetable oil to the melted chocolate and mix well.
- Pour the melted chocolate into a silicone egg mold.
- Let the chocolate set in the refrigerator for 30 minutes.
- Remove the chocolate from the mold carefully.
- Melt the white chocolate chips and add food coloring if desired.
- Decorate the dark chocolate eggs with the colored white chocolate and edible glitter.
- Allow the decorations to cool and set.
Notes
- Use high-quality chocolate for better taste.
- Experiment with different colors and patterns.
- Store finished sculptures in a cool place.
- Prep Time: 45 minutes
- Cook Time: 0 minutes
- Category: Dessert
- Method: No-bake
- Cuisine: American
- Diet: Vegetarian
Nutrition
- Serving Size: 1 egg
- Calories: 200
- Sugar: 15g
- Sodium: 5mg
- Fat: 12g
- Saturated Fat: 7g
- Unsaturated Fat: 2g
- Trans Fat: 0g
- Carbohydrates: 22g
- Fiber: 2g
- Protein: 3g
- Cholesterol: 0mg
Keywords: chocolate art sculpture, Easter eggs, dessert, craft